Showing posts with label IT Support. Show all posts

Tuesday, January 21, 2014

So you got a new computer, what's with all these tiles!?!?

Default new user "Metro" screen for Windows 8.1 
As the expiration of support for XP looms, many people out there are getting new computers, laptops, and even tablets.  If you have been an avid user of XP or Windows 7, then getting that first Windows 8 system is going to be a bit of a shock.  As you can see from the left, that is essentially your "Start Menu."  It is loaded up with all sorts of apps right?  So most of those tikes are actually just internet feed apps.  The tile screen was really designed for touch enabled devices.  My first recommendation for someone asking about a new computer, is to get one with a touch enabled screen.  This will make your Windows 8 experience a much more positive one.  The next thing you can do is clean up the tiles.  Right clicking a tile will cause a selection mode to come up.  You can right click on each tile you would like to "unpin" and select "Unpin from Start."


The next thing you will want to do is upgrade (if it didn't come installed) to Windows 8.1.  This a free update from Microsoft through their app store (yes they have one too now).  They have a nice step-by-step tutorial here.  This will add some more familiar functionality to the Tile screen and the Desktop.  For example to access applications like the Control Panel, Paint, or Notepad, you can now click on the arrow at the lower left corner of the Tile screen.  From here you can right click any of the list applications and add them to both the task bar on the desktop screen or as a Tile on the Tile screen.    The other navigation issue is the implementation of hot edges.  I would say corners, but in most cases hovering the mouse cursor over any of the edges on the tile screen and desktop may produce an option to switch from that current screen.  Most new systems will run you through a quick tutorial with instructions on what to do near each of these hot edges.  If you are purchasing from a store, I would recommend having the sales person walk you through the changes in Windows 8 from the earlier Windows versions.

Now why did I recommend getting something with a touch enabled screen?  Well besides the fact that the the "LabTab" or "TabTop" (or whatever you want to call it) is making a come back, Windows 8 is designed for this type of device.  It is meant to be interacted with through a touch screen using your hands.  Swiping and scrolling works much smoother this way.  My wife just recently picked up a Surface Pro, so I was able to play a bit more with the touch features.  It is a bit different using your hands and the stylus than the mouse.  Right clicking changes to a click-and-hold method.  So you click on an icon, selection, or whatever, hold until you see the circle appear, then let go.  You will then see the context menu.  If you have a jittery hand, this can get pretty frustrating and you might switch to dragging icons and tiles all over the place, rather than pulling up the context menu.  The normal navigation around the tablet environment still feels much more natural using your hands as opposed to the mouse.  Another cool feature that is present due to the stylus being added is the handwriting-to-text.  If the new interface is still a bit confusing, then check out their "Help + Tips" app for some visual instructions.

All-in-all it is not a terrible operating system.  From a security standpoint it adds a number of improvements that were not native to Windows 7 and almost non-existent in Windows XP.  The Surface has some nice features as well.  The Stylus is pretty useful, it can also attach on the magsafe power connector (when you are not charging the device).  It has a full size USB port and Micro SD slot.  These come in handy for attaching additional storage.  It also has an external mini-display port in case you want to connect it up too a secondary display.  The only major drawback to the Surface Pro is the limited hard drive size (128GB).  It seems like a lot, but if you are switching from a more full size laptop with a 500GB+ drive, then you may have some issues moving some of your larger files over.

So there you have it, Windows 8 in a nutshell, you even got a bonus mini Surface Pro review.  As always feel free to leave any comments or questions.  Change does suck at times but a little patience and a lot of googling, can help you through the transition.  It also helps if you are married to or dating an IT guy/gal.
Saturday, June 30, 2012

So this box keeps popping up about something wanting to do something....


I'm sure those of us in IT have never heard such a comment from friends, relatives or random stranger on the street who sees you messing around with some fancy gadget.   But in case you have we probably spend as much time trying to tell them how to send us a screenshot of the message, error or fake antivirus warning that they have had for the past 3 months but didn't bother telling you about it...

If you haven't figured it out just yet, I received such a comment today from my dear old Dad.  Unfortunately I could not remote into his computer to see this mystery box; I know I fail for not trying while driving home from work.  So I told him to take a screenshot of the message and email it to me.  Naturally he did not know how to accomplish this task so I told him I would email him some directions tonight.  Which lead me to the blog that I have neglected for the past couple months.  The next few minutes I will enlighten those of you non-techies on how to take a screenshot.  After all, I picture IS worth a thousand words (sorry)...

First what tools are available for taking screen shots?  Well it depends on your platform.  Here is a simple breakdown:

Right-CTRL+ALT+Print Screen:  Key stroke based and supported in Windows XP and Windows 7.  Actually this pretty much existed since Windows 95 I believe.  It takes a screen shot of the active window.  This works great for those pop-ups so you don't capture your entire desktop.

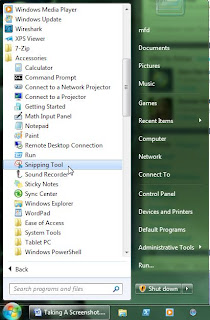
Snipping Tool:  This is present in Windows 7.  It is accessible from the Start Button>All Programs>Accessories>Snipping Tools (see image at the left).  This tool allows you to select a section and capture it.  You can then save it or copy it to that email you will be sending to your family helpdesk rep.

GreenShot:  This is my personal favorite capture app.  It is a free opensource utility available at http://getgreenshot.org/.  This is available for Windows XP and 7.  I find it a bit more versatile than Snipping Tool and you can map it to Print Screen.  This makes it seem faster to take screenshots.  It will automatically save the file after opening.  It also gives you some markup tools (shapes, arrows, etc…).  This is excellent for documenting processes with screenshots.

Now that you have the tool set available, it’s time to get a shot.  For simplicity sake, I will use Snipping Tool but by all means use whatever method is easier (Greenshot).   The Windows 7 Snipping tool is pretty cut and dry.  It can be accessed by navigating the Windows 7 Start menu and you will find it under “All Programs” and it will be in “Accessories.”  Alternatively you can type “Snipping Tool” in the search box in the start menu.

Once it opens it will be in capture mode, the screen will get “foggy” and your mouse cursor will become cross hairs.  Simple click and drag across the area you want to capture and then left go.  The image will open in the snipping tool for further editing and saving.  That is all it takes for getting that pesky error box captured so you can send it to your very computer literate friend, brother, sister or cousin.  One limitation to Snipping Tool is if you are trying to capture the start menu.  It will close each time you click off to go to the tool.  That is when I love having Greenshot.

Enjoy!