I'm sure those of us in IT have never heard such a comment from friends, relatives or random stranger on the street who sees you messing around with some fancy gadget. But in case you have we probably spend as much time trying to tell them how to send us a screenshot of the message, error or fake antivirus warning that they have had for the past 3 months but didn't bother telling you about it...
If you haven't figured it out just yet, I received such a comment today from my dear old Dad. Unfortunately I could not remote into his computer to see this mystery box; I know I fail for not trying while driving home from work. So I told him to take a screenshot of the message and email it to me. Naturally he did not know how to accomplish this task so I told him I would email him some directions tonight. Which lead me to the blog that I have neglected for the past couple months. The next few minutes I will enlighten those of you non-techies on how to take a screenshot. After all, I picture IS worth a thousand words (sorry)...
First what tools are available for taking screen shots? Well it depends on your platform. Here is a simple breakdown:
Right-CTRL+ALT+Print Screen: Key stroke based and supported in Windows XP and Windows 7. Actually this pretty much existed since Windows 95 I believe. It takes a screen shot of the active window. This works great for those pop-ups so you don't capture your entire desktop.
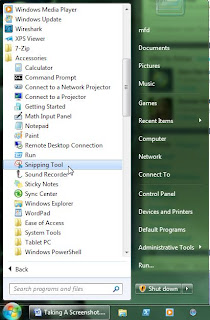
 Snipping Tool: This is present in Windows 7. It is accessible from the Start Button>All Programs>Accessories>Snipping Tools (see image at the left). This tool allows you to select a section and capture it. You can then save it or copy it to that email you will be sending to your family helpdesk rep.
GreenShot: This is my personal favorite capture app. It is a free opensource utility available at http://getgreenshot.org/. This is available for Windows XP and 7. I find it a bit more versatile than Snipping Tool and you can map it to Print Screen. This makes it seem faster to take screenshots. It will automatically save the file after opening. It also gives you some markup tools (shapes, arrows, etc…). This is excellent for documenting processes with screenshots.
Now that you have the tool set available, it’s time to get a shot. For simplicity sake, I will use Snipping Tool but by all means use whatever method is easier (Greenshot). The Windows 7 Snipping tool is pretty cut and dry. It can be accessed by navigating the Windows 7 Start menu and you will find it under “All Programs” and it will be in “Accessories.” Alternatively you can type “Snipping Tool” in the search box in the start menu.
Once it opens it will be in capture mode, the screen will get “foggy” and your mouse cursor will become cross hairs. Simple click and drag across the area you want to capture and then left go. The image will open in the snipping tool for further editing and saving. That is all it takes for getting that pesky error box captured so you can send it to your very computer literate friend, brother, sister or cousin. One limitation to Snipping Tool is if you are trying to capture the start menu. It will close each time you click off to go to the tool. That is when I love having Greenshot.
Enjoy!