Monday, April 22, 2013

Quick fun code with Powershell

So one of my areas of improvement this year is in my coding ability.  Just finished the Python course from Codecademy.com (I highly recommend checking them out), but I also enjoy Powershell, as I primarily work on Microsoft systems.  I follow the MS Scripting Guy's blog - http://blogs.technet.com/b/heyscriptingguy, he always has some great material to check out and try.  Right now is the start of the 2013 Scripting Games so to honor it, he posted a great tip for pulling down the latest blog posts for the games.  You can check out the code here: Use PowerShell to Keep Up-to-Date with the 2013 Scripting Games.

So the initial code is pretty simple.  When you run the script it will dump to your Powershell console.  But what if I don't want to review it just yet and save it for later?  I could dump the results to a file with a number of methods, but I really want to make sure I check it out. So why not generate a web page with the results?  That would be perfect!!  Powershell has a number of ConverTo-X commands, they happen to have one for ConvertTo-HTML.  Here is the modified code:

Invoke-RestMethod -Uri $sg2013 | select title, pubdate, link |
ConvertTo-Html | Out-File E:\Code\Powershell\rss_reader.html

Notice I also added the link to the select statement.  The last half of the code sends the information to the designated out-file.  But I am not fond of the results.
See?  Very boring.  Believe it or not, there is quite a bit of code present in the page.  Since the Conversion occurs with the original output in a table format, it actually created it as such in the html.  Unfortunately no color.  Lets see if we can spruce things up a bit.  With a bit more research into ConvertTo-Html, I found that it has options for the various sections of an HTML file: HEAD, BODY, and TITLE.  For this example we will stick with working in the HEAD section.  In the HEAD section we could call various STYLE configurations that will apply to the whole page.  A new variable will need to be created that will contain the content for the HEAD section:

$style = "<style>BODY{background-color:black;}</style>"


Invoke-RestMethod -Uri $sg2013 | select title, pubdate, link |
ConvertTo-Html -head $style | Out-File E:\Code\Powershell\rss_reader.html

We are almost there, unfortunately this creates a page with a black background, not good since the font color is also black.  The style variable can be further declared using a series of "$style = $style + ..." calls.


$style = "<style>"
$style = $style + "BODY{background-color:black;}"
$style = $style + "BODY{color:lime;}"
$style = $style + "</style>"

This essentially builds out the style tag for the page.  You can add additional code to format the table colors as well.  But lets keep it simple, here is how the new page looks:
That is much better, you can experiment with the colors if black and lime green are not your thing.  We will add one more option to the ConvertTo-Html function using the -body option:


Invoke-RestMethod -Uri $sg2013 | select title, pubdate, link |
ConvertTo-Html -head $style -body "<H2>2013 Scripting Games Feed</H2>" | Out-File E:\DMZ\Code\Powershell\rss_reader.html


This adds a nice heading to the page.  So this is great, I have a nicely formatted list of items from the Scripting Guy's blog, but how do I remember to go back and check???  Well you can call the following command in the script to open the file in a browser:

Invoke-Expression E:\Code\Powershell\rss_reader.html

This will open the HTML file up in your default browser.  So if you want to get really crazy, add this as a scheduled task to run every couple hours/days/weeks etc.  A couple things I will be trying to add are some conditions so that I don't just keep getting a full list of items.  I may only want to view the latest posts and I may want the list to convert the links to hyper-links.  Well I hope you enjoyed, now go out and code!  

Friday, March 22, 2013

You Just Won A MEGA DISCOUNT!!!! (no you didn't)


You are an infosec geek when you receive a call that you know is a scam but you pick it up anyway to hear the recording. You then do some internet recon on the domain they tell you to go to and find that it was registered very recently. Next you pull up your sandbox system, load up BurpSuite and proceed to visit the very obvious phishing site to see what happens.
Fake AT&T Phishing Site

So random pre-recorded call from a bogus 800 number.
"You just won the AT&T Mega Discount for $555 dollars off your next AT&T bill. You just need to visit att555.com to claim your discount."
So you go to this site and say "Hey this looks legit, all the logos are there and such. Let me just log in and get my reward!"

Real AT&T Account Site
And now you just gave some guy in Germany your AT&T Account creds and your last 4 digits of your Social. Notice the attached images? The first is the phishing site, it has all the logos and looks very similar to the real AT&T Account site (next image). But, the bogus site has an extra field for "Last 4 of SSN." In most cases AT&T will never require this unless you forgot your password or they need to verify your account when you call them.

With BurpSuite running in intercept mode, you can watch the activity as you throw in the fake information in the site. It took whatever I submitted with no validation (another sign it is a bogus site). When I hit "log in", a ton of stuff happens in the background. It sends the data you entered to an web address in Germany:
hxxp:[85.25.17.164]kingpin/deduct2.php. 
This happens in clear text as well, with no SSL anywhere to be seen.  This is just one more thing to add to the list of suspicious activity.  If they phisher was more creative, they would have at least used a bogus SSL Cert to add more realism to the ruse.

So moral of the story, think before you click! Be aware of your surroundings. If something is too good to be true... it probably is.

Tuesday, January 1, 2013

Open Source Firewall project... Day 3, Time for Splunk!

So I scrapped the full UTM solution seeing that Snort has some serious memory requirements.  I did not want to add any other packages to this device.  If you are curious as to what would have been done you can check out SmallNetBuilder's UTM Guide.  If I can obtain some better hardware I may move to a beefier solution, but for now, I will be happy just seeing more detailed firewall and IDS/IPS data.

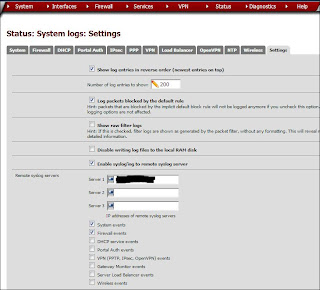
So if you have worked with pfSense at all, you will notice that it has limited internal logging capacity.  You can adjust but eventually logs will be overwritten.  With the addition of Snort, you now have another important log to look at.  There is an option for each of the managed interfaces in Snort to send data to the System logs, but remember, you will now overwrite those with more data.  So best solution is to send all this information to a Syslog server.  There are a couple solutions out there such as KiwiSyslog, but I sent the information to my Windows 2008 server running Splunk.  There is a decent guide on SeattleIT.Net.  That one includes using the Google Maps app in splunk to track the geo-IP location of external hosts.  The guide does contain two important config files needed, which is why I referenced it.  You will need those so Splunk knows how to parse the information it receives from pfSense.  On the pfSense box you will need to enable logging to a Syslog server.  This is done from Status-->System Logs-->Settings (see fig 3.1).
Fig 3.1 - Log Settings pfSense
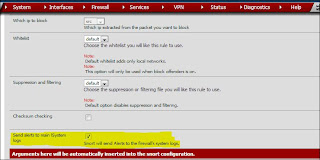
From here you can add the server and the logs you want to use.  Unfortunately, pfSense only supports the UDP port 514 for Syslog data.  This is the default configuration, there are some guides out there that instruct you how to change this setting but that is beyond the scope of this discussion.  One more thing needs to be done here before we head over to Splunk.  I want to make sure I capture the Snort logs as well.  I haven't found an individual setting for Snort in pfSense to send logs to an external source, but there is an option to send them to the System Log for pfSense.  This will work out seeing that I already set the System logs up to go to a Syslog server.  Head over to Services-->Snort and edit each interface you the logs for.  You will want to check off the option to "Send alerts to the main lSystem logs (see fig 3.2).
Fig 3.2 Sending snort alerts to System Logs
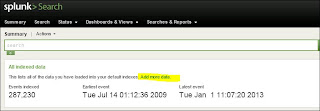
Now that we have logs to collect, it is time to turn on the feed in Splunk.  This was tricky at first then I realized I made a dumb mistake and it worked perfectly.  If you are using a Windows server with the firewall enabled, you may have to allow the UDP 514 traffic from the pfSense box.  The easiest way to add the information to Splunk is to go under the Search section and "Add more data" (See fig 3.3).
Fig 3.3 Add Data to Splunk Search
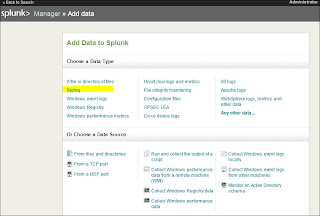
From the next section you will be able to choose the type of data you want to add.  For this we will choose "Syslog" (See fig 3.4).
Fig 3.4
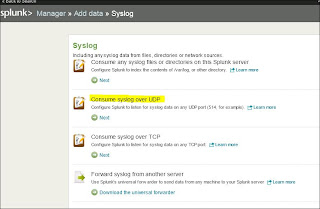
Choose the type of Syslog you want, for this I used "Consume syslog over UDP" (See Fig 3.5).
Fig 3.5
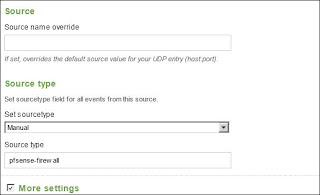
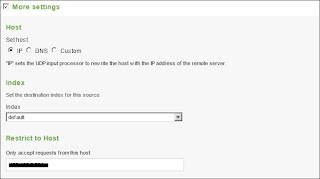
This brings you to the configuration screen.  Set the port to 514 since that is the default used by pfSense.  Then configure the remaining settings and check off "More Settings" for additional options (See Fig 3.6-7). 
Fig 3.6

Fig 3.7
Use the manual option for Source Type so you can set the correct name that coincides with the props.conf and transforms.conf files created in the SeattleIT.net blog.

Also notice in Fig 3.7 the "Restrict to Host" option.  This will help lock down the what host Splunk will listen for, any other syslog servers will be ignored.


Once the Splunk server has been rebooted, you should start seeing information flow in from pfSense.  At this point you can start searching for specific events from Snort or the Firewall logs.  Right now the logs from Snort are mixed up with the System log activity of pfSense.  If you choose the SourceType="pfsense-firewall" you will see only the firewall logs.  For now I created an event type based off a simple search string 'source="udp:514" snort'.  I will most likely move to pulling out the Snort logs as a separate feed but for now this will work just fine.

At this point I have called it a day and the initial project is done.  I will most likely tweak the configuration and try pull out some more useful information that will assist in setting up some decent block rules in Snort.  But that is enough work on my vacation and the Xbox is calling!  If you have any questions, feel free to leave a comment or hit me up in Twitter.  I hope you all kick the new year off right!

Open Source Firewall project... Day 2ish

OK so this is a couple days combined.  We left off with getting access to the WebGUI and making sure everything was good to go for connectivity.  I put a hold on configuring additional firewall rules for OpenVPN but will look to getting that up in the next day.  I spent some time checking out the new data I was logging for external access attempts.  Eventually this information will be sent to a log management solution for better data gathering, more on that later.

Over the last couple days I worked on getting Snort installed and configured as well as setting up the Dynamic DNS service I use.  DynDNS (dyn.com) is a nifty service that allows you to have a dynamic public facing IP address (typical for residential ISP customers) but you can assign a static DNS record to that interface.  The service utilizes an agent based, manual, and/or account based method to update the host information.  Most broadband routers and SOHO style firewall services have the ability to communicate with Dynamic DNS services.  The typical free solutions give you some pre-defined domains to use, but if you want to get fancy, you can just create a CNAME with your current DNS host and point it to the DynDNS domain for example: remote.mydomain.com --> remote.dyndnsdomain.com.

Now that all that is settled, we can proceed to getting the IDS/IPS up and running.  For that we add the snort package.  If you are following the guide from SmallNetBuilder, then you see it is pretty simple.  Always remember when configuring your IDS/IPS, only turn up the rules/Categories related to your network.  For example, if you do not have Oracle Servers, then don't turn on the Oracle rules.  This cuts down on the amount of alerts you will receive from the IPS.  If this is your first IPS solution on your network, you may also just want to enable the IDS portion first just to see what is going on.  If you see immediate activity that you know should not be occurring, then enable the IPS portion for that specific activity.  Upper management tends to frown on bringing the business to a screeching halt because your custom application looked like bad network activity to Snort.  For a home network straight Snort is good enough, but for business you may want to consider the SourceFire appliance.  It is much easier to call support to fix something ASAP rather than scouring Google.

I initially turned up the block rules for the WAN and left them off for LAN.  I had some issues though with the blocking on the WAN since it was blocking the pfsense package management traffic.  I am currently just in IDS mode on both interfaces since my main goal here was to see what is happening on the home network.  Later I may build up some suppression/whitelist rules,

The final part of the guide instructs you to install IP-Blocklist.  The application is basically a managed blackhole solution for the firewall side of pfsense.  You configure it to look at some blacklists and it will drop packets for IP addresses on those lists.  This is great if you want to block traffic from specific countries.  The IP-Blocklist is no longer fully supported by pfsense, they offer pfblocker which works much the same way and is added to your Firewall controls.  I did not do much to configure this yet.  Again I want to see where traffic is coming from then I will look at initiating some blocks.

Once Snort was running I did notice some errors popping up repeatedly on the console.  Many where due to ACPI errors.  I found some discussions pointing to a variety of items for FreeBSD and hardware issues.  The one that the issue may be related to was with the onboard Realtek NIC.  Disabling the NIC in the BIOS and rebooting seemed to stop the errors.  Of course that angered pfSense and forced me through the config prompts.  After fixing all that, re-enabled the onboard NIC and received the ACPI errors again.  Rebooted using Safemode and a number of errors were auto-corrected.  Unlike a Windows Safemode reboot, no services were disabled.

This is where I pretty much called it a day.  Next up is adding this new found information to Splunk.

Wednesday, December 26, 2012

Open Source Firewall Solution... Day 1

So I've been wanting to do this project for along time but never can seem to find time to get it done.  Nor can I seem to get the hardware available when it is needed.  When people are entering the Information Security field, one of the toughest things to do is get experience working with some of the software and hardware systems out there.  So if you can't get the experience at work, build something at home!

The Final Goal

I am finally working on putting together a UTM (Unified Threat Management) network in my home.  What that means in a simple form is the ability to catch malicious activity as it is happening on my home network and put a stop to it.  It isn't just one product that does this though.  It typically is a layered security approach relying on input from a number of things.  For example; firewall logs, IDS/IPS (Intrusion Detection/Protection System), Client Anti-Virus alerts, and whatever other logs you may have  at your disposal.  The core component around this is a log management system and/or a SIEM (Security Information and Event Management) solution.  In small networks such things may not be needed, but if you enter an enterprise network with thousands of servers, workstations, and network hardware, managing events can be very cumbersome.  If not properly staffed, things may fall through the crack.  It doesn't even need to be malicious, it could be something as simple as a hard drive failure.  A simple log management solution will collect the logs from the many devices, but you still need to parse out the data and try to connect some dots.  The SIEM is the key, this will help with that and in some cases it can correlate the data with other logs that are being collected and can alert on suspicious activity.  So I never really got to put something like this together, since I am currently in a "hands off" position.  I get to plan it out on paper, make some recommendations bases on research, but someone else will be tasked to build it.  Frankly I like getting my hands dirty and I like having proof that I know what I am recommending.  So I look at building this stuff in my home lab.  On to the build....

What is needed to get started...

Using the following site for guidance: Build your own IDS Firewall with pfsense.  We will be using the open source firewall solution called pfSense.  My build is actually just the firewall with no guest wireless.  Hardware wise, I will be using a small Micro-ATX system I call my Shoebox.  It is running an atom processor intel board, 2GB of RAM, 250GB 2.5" SATA drive, and a CD-ROM.  It is about the size of a shoe box.  The Atom board runs pretty quiet as well, so if you don't have a dedicated network closet, no big deal.  The system also has two network cards.  It has the on-board NIC and a PCI based Intel Pro 1000.  If you want to follow the linked guide, you will need to have a dual port PCI NIC.

Day 1

Nothing to fancy here since I got started a little late.  You will need to have a keyboard and monitor for this part.  Afterwards is either the WebGUI or SSH.  I downloaded the USB boot image of pfSense and used physdiskwrite to image a 4GB flash drive from my Windows desktop.  For anything greater than 2GB, you will need to use the "-u" switch with the command and you will need to run the command prompt as Admin in order to see the drives.  pfSense is now bootable from the flash drive.  At that point I fired up Shoebox with the USB connected and followed the Default startup mode.  You can pretty much let it boot with the defaults.  It will take you through the interface configurations.  From here I strayed from the guide since I was not yet ready to connect to the "WAN" (my cable modem).  So I just popped the ethernet cable between each interface as I was prompted.  I did find that the auto-config was not exactly picking up the interface, so I had to manually enter the name.  You will see this during the first request to auto-configure ("a").  In my case the intel PCI NIC was "em0" and the RealTek on-board NIC was "re0".  Once the network configuration was complete, you will see the pfSense menu.  Before I proceeded, I reset the LAN interface since it uses 192.168.1.1 by default.  I switched it to reflect my current network but using option #2 from the menu - Set Interface(s) IP Address.  I then chose to install to hard drive.  Basically this part takes the information saved to RAM and builds the image to the local hard drive.  Use the Quick/Easy Install method.  My first attempt lead to some annoying boot errors with ACPI.

Installation completed and you are then given the default username/password and the WebGUI address https://<LAN_IP_Address/.  It will use a self-signed cert so you will see a warning when you first connect.  You can always add the cert to your trusted list or you can be a real go-getter and get your own trusted cert from a third party.  But that costs extra and I am a little lazy.  After finishing up changing the default admin password and adding a normal user for SSH access later on, I pretty much called it a night.  Tomorrow I will move the device to the WAN and test connectivity.  Then I will create some firewall rules and get SSH working (for internal use).  Stay tuned....


Sunday, October 7, 2012

DerbyCon 2.0 review and other ramblings

Yes this is another DerbyCon review.  I'll try not to write the same stuff as the other 1500 blog reviews already out there.  I will say that it was awesome, and I think those of us that attended will agree on that fact.    First and foremost, if you are interested in pursuing a career in Information Security, you must attend a conference such as this.  The setup makes it very accessible for attendees to engage in great discussions around hacking, InfoSec and just about anything else.  Don't worry, you don't need to be a traditional hacker to get something out of this Con.  I met a programmer who currently does nothing with InfoSec.  He wants to learn more about the threats as well as why secure coding is important.  Even though you don't need to hack to enjoy yourself, you may find yourself attempting to pop a lock in the LockPick Village, or maybe picking up a soldering gun in the hardware village.  After you leave this Con, you may even look at picking up a Raspberry Pi to play around with.  This is a true community event where one is surrounded by people willing to share their knowledge.

The speakers made themselves pretty accessible, you did not need to wait in long lines to get seat for a talk, and you didn't need to leave a talk early to get to another talk.  Speaking of talks... well they had such a large volume of CFP entries, that they had 4 main tracks, they were separated into: Break Me, Fix Me, Teach Me, and The 3-way (a mix of the other 3) and opened a 5th track called "Stable Talks."  There were so many great topics, it was very difficult to determine which ones to attend.  Luckily they captured the 4 main tracks on video and most of them are posted to YouTube.  You can get to the full list at IronGeek's (Adrian Crenshaw) page: DerbyCon Videos.  Although the Stable Talks were shorter, that didn't affect the quality.  I think some of these talks will move into the main tracks next year.

So I arrived Thursday afternoon. Unfortunately, I was not there early for the training, which was going on Thursday and Friday morning.  They had a number of quality training opportunities which covered everything from Social Engineering to Reverse Engineering.  Thursday evening I was able to grab some dinner with a fellow EH netter (ethicalhacker.net member).  We discussed some of the finer points of working in a large organization and trying to push proper security procedures.  We were later joined by two more members and continued the discussion over Ethiopian food (which was mighty tasty).  Later that evening I was able to experience my first SlideShare Roulette at "Whose Slide Is It?".  For those that don't know, this is basically a test of one's presentation skills.  The moderator will pick a random slide deck from the slideshare.net site based on topic suggestions from the audience.  The presenter then must use his/her skills and work with the given slides.  It got interesting when the hotel staff arrived with 100 shots of bourbon courtesy of HD Moore (CSO/Chief Architect @ Rapid7).

Friday morning was pretty much just hanging out and waiting for the opening ceremonies.  There were some great discussions going on in the hallways and main lobby of the Hyatt.  Some of the best talks can be found in these "hallway cons" so I highly recommend getting involved in these sorts of discussions.  You will learn something and you may even have a different point of view to add that could benefit the group.  Eventually 1:00 pm rolled around and the talks began!  They kicked it off with keynotes from HD Moore's The Wild West, Dan Kaminsky's Black Ops, and Mudge's talk about the Cyber Fast Track program from DARPA.  After dinner the 5 tracks began and continued through the weekend.  I will not do a review of the talks I attended since I was pretty much in absorption mode and I am still catching up on the ones I missed as well as re-watching those I attended.

As I touched upon earlier, there were a number of events going on during and after the talks.  The big one was the CTF (Capture The Flag) competition.  Your mission is to use your skills in hacking to find all the flags on the CTF network.  I attempted but never got on long enough to even find the "beginner" flags.  This was in part due to the WiFi network for the event being unavailable and the bouncing in and out of talks.  These competitions are best handled by teams since the expertise needed to find the flags will vary.  You may have to write an exploit or use some forensic skills to find the various flags.  Hackers For Charity (HFC) held both a silent and regular auction throughout the weekend.  They raised over $33,000 thanks to the very generous community.  If you wanted to just wind down you can head over to the theater for the Hacker Movie Marathon.  Maybe you want to know if you should get your CISSP, but you aren't sure if you have the right knowledge, then you could have headed over to "Are You Smarter Than a CISSP?" held on Friday night.  You were given questions from each of the 10 CISSP domains, you can choose to answer them yourself or discuss it with the panel of actual CISSPs.  They were also available to save you if you got a question wrong.

Sadly Sunday morning came and it was time for me to leave the land of bourbon and horses.  Unfortunately there were still a slew of talks and the closing ceremonies to attend but I will catch them on video.  Next year I will plan on taking the training and staying until the closing ceremonies!  One more thing specific to the conference, a big THANKS! to the organizers and volunteers.  They made this such a great experience that I am still missing it a week later.


Wednesday, August 22, 2012

Basic Security and You... and your friends, and your clients...

It seems as if now-a-days when someone mentions Information Security, the first things that might come to mind are the dreaded words: APT, China, and Cyber War.  But there is much more to it I think.  The government is definitely on the cyber war kick.  With nation states actively sponsoring attackers, and defense contractors locking up their IP tighter than the great firewall of China, who could blame them?  I mean viruses and other malware just jump through the air now and land on systems that are supposed to be off the grid!  Its madness!!!  The apocalypse is not coming on December 21st, it is already here!  So while all the big boys fight it out with their budgets and search for the newest best shiny toy or magic unicorn slaying bullets, what are the little guys doing?  Who is protecting them?


Over the weekend I was messing around with Shodan (http://www.shodanhq.com).  For those that don't know, this is basically a search engine to find online devices such as routers, webcams, VoIP phones, Power plants, and Wind Turbines... wait what?  Yep, you know those important systems that feed our electrical grid and people are always concerned with being attacked? But  that is a discussion for another time.  So back to this awesome tool and its many uses...  Now one might ask, "How can something like this be allowed to exist???"  Well that is easy, the data it searches is publicly available on the Internet.  It searches based on any number of criteria such as open ports, website headers as well as response banners.  You can also drill down to specific locations.  For example you can search for open FTP ports in your home town.  Now I am not from Tampa, but I didn't want to out my own town.  So as I was popping in different ports to search on, I stumbled across a list of open RDP (remote desktop protocol)  ports.  Of course my curiosity gets the better of me and I find one device is a Windows XP system that could possibly be linked to say a financial department at a local University.  I was like oh fudge (only I didn't say fudge)!

OK, so why is this so bad?  I mean after all the staff must need to work from home and the school doesn't want to give them laptops for the fear of them being lost with important data on them.  But I am sure they encrypt all their laptop hard drives right?  Sadly I doubt it.  But who cares about laptops when you can just walk up to the front door and ring the door bell!  Someone might say "so what, even if they attempt to log in using a brute-force password attack, the accounts will lock."   But there is more than one way to skin a cat.  Enter Microsoft Security Bulletin MS12-053.  This is a vulnerability in Remote Desktop which could allow remote code execution.  Essentially, using the RDP service, I can send instructions to the target without actually having to log onto the system.  Well I can't, but I am sure someone much more talented than I, can.  So this is a big deal, can an organization confirm that they are 100% compliant with patching to prevent these attacks?  Knowing how much work it takes to keep a much smaller shop compliant, I would say, no way!  But who knows, maybe they are.  It still begs to question, if they are so sure of their compliance, why are they not using much more secure methods of granting remote access to their network?  So this brings my long winded rant to a close and I will leave you all with the following thought...

I had no luck with my other University contacts, so I am now tasked with the next steps:  Do I track someone down at the school and say "um... you dropped something here" and show the them site and query?  Or do I say screw them and their crappy security and move on?  The enterprising youngster in me say, "hmmm could be a nice lead."  But the paranoid adult in me says "Hell no they will probably think you are hacking their network!"

So what do you think?  Leave your comments below!

UPDATE 10/15/2012
Sent the "Data Security Admin" an anonymous email stating the problem and heard nothing.  Oh well I tried.  On to the next task.